Celiac's Disease has entered my home. My poor stepson is in the process of a diagnosis and as we wait for the specialist to see him, we have started a gluten-free diet when he is home. The next few entries are going to focus on the fun world of GF living!
But first, I want to share some great resources I have found in my quest for edible gluten-free foods.
Locally we have an amazing bakery in New Westminster, Cloud 9, that makes gluten-free goodies that my stepson absolutely loves!
Check out more about their productes at the link below:
http://www.cloud9specialtybakery.com/
Some great online resources that I have found include the following;
Gluten Free on a Shoestring
A website that strives to make gluten-free eating affordable and enjoyable.
Stone Soup
Easy, five ingredient meals. It's easy to keep the gluten out when you keep things simple!
Allergic Living
A good resource for anyone dealing with food allergies.
Simply Without
A collection of recipes and resources for a vegan, gluten-free life.
Doctor Tom
My cousin highly recommends this doctor as being an expert in the gluten-free world.
Do you have any favourite websites for gluten-free living?
Share them in the comments section!
Wednesday, November 4, 2015

Friday, July 10, 2015
Roasted Green Beans with Mushrooms, Balsamic, and Parmesan
It has been far too long, my foodie friends! But I am back, and with some garden spoils to use in my cooking efforts.
I found it on Pinterest, but the orginal recipe is found on a site called Kalyn's Kitchen. The link is here: http://www.kalynskitchen.com/2009/01/recipe-for-roasted-green-beans-with.html
Roasted Green Beans with Mushrooms, Balsamic, and Parmesan
(Makes 4-6 servings, recipe created by Kalyn, and copied here for reference)
Ingredients:
8 oz. mushrooms, sliced in 1/2 inch slices (I used brown crimini mushrooms, but any mushrooms will work)
1 lb. fresh green beans, preferably thin French style beans
1 1/2 T olive oil
1 T balsamic vinegar
salt and fresh ground black pepper to taste
2 T finely grated parmesan cheese
Instructions:


I found it on Pinterest, but the orginal recipe is found on a site called Kalyn's Kitchen. The link is here: http://www.kalynskitchen.com/2009/01/recipe-for-roasted-green-beans-with.html
Roasted Green Beans with Mushrooms, Balsamic, and Parmesan
(Makes 4-6 servings, recipe created by Kalyn, and copied here for reference)
Ingredients:
8 oz. mushrooms, sliced in 1/2 inch slices (I used brown crimini mushrooms, but any mushrooms will work)
1 lb. fresh green beans, preferably thin French style beans
1 1/2 T olive oil
1 T balsamic vinegar
salt and fresh ground black pepper to taste
2 T finely grated parmesan cheese
Instructions:
Preheat oven to 450F/230C. Wash mushrooms and let drain (or spin dry in salad spinner, which is what I did.) While mushrooms are drying, trim ends of beans and cut beans in half so you have bite-sized pieces. (An easy way to trim them is to gather a small handful of beans, stand them up on cutting board, holding loosely so they will fall down and have ends ends aligned, then trim. Repeat with other end.) Cut mushrooms into slices 1/2 inch thick.
Put cut beans and mushrooms into a Ziploc bag or plastic bowl. Whisk together olive oil and balsamic vinegar and pour over, then squeeze bag or stir so all the beans and mushrooms are lightly coated with the mixture. Arrange on large cookie sheet, spreading them out well so beans and mushrooms are not crowded. Roast 20-30 minutes, starting to check for doneness after 20 minutes. Cook until beans are tender-crisp, mushrooms are cooked, and all liquid on the pan from mushrooms has evaporated. Season beans to taste with salt and fresh ground pepper, then sprinkle with finely grated Parmesan. Serve hot.
~~~~~~~~~~~~~~~~~~~~~~~~~~~~~~~~~~~~~~~~~~~~~~~~~~~~~~~~~~~~~~~~~~~~~
A few things I learned about this recipe -
Make your mushroom pieces a good size. They will burn if they overcook. The beans will just shrivel and become tasteless (yes, unfortunately I learned this the hard way). About a third of the veggies I cooked came out over done. Consistent sizing is also very important!
Ensure that your veggies are thoroughly coated before putting them in the oven. I think mine were a little dry and I ended up having to coat them with a little balsamic glaze when they came out of the over.
Other than that, this recipe was a big success! My family does not like green beans, so seeing an entire pound of them get demolished was pretty heartwarming.


Sunday, July 27, 2014
Easy Peasy Lettuce Wraps
Lettuce Wraps - a quick, easy, and delicious dinner option.

Ingredients:
1 lb lean ground beef (can substitute other meat or tofu, if preferred)
1/4 cup zucchini
1/4 cup onion
1/4 cup mushrooms
1/4 cup orange peppers
1/4 cup water
2 tbsp soy sauce
2 tsp brown sugar
1 tbsp Chinese 5-spice powder (**see excerpt below):
to taste: chili powder, salt, and pepper
1 head lettuce (the crisper, the better!)
**Used extensively in Chinese cooking, this pungent mixture of five
ground spices usually consists of equal parts of cinnamon, cloves, fennel seed,
star anise and Szechuan peppercorns. Prepackaged five-spice powder is available
in Asian markets and most supermarkets.
Read more at: http://www.foodterms.com/encyclopedia/chinese-five-spice-powder/index.html
Read more at: http://www.foodterms.com/encyclopedia/chinese-five-spice-powder/index.html
How to cook:
1. Dice all vegetables into small pieces.
2. Take your raw meat or tofu and vegetables in a bowl, add water, soy sauce, brown sugar, and spices. Marinate for twenty minutes in the fridge.
3. Cook mixture on the stove until meat is cooked and any excess sauce has cooked off.
4. While the mixture is cooking, take the head of lettuce and rip off the pieces as carefully as possible, in order to make little lettuce boats to fill with yummy meat mixture.
5. Once the mixture is cooked, serve with lettuce and side (e.g. rice, quinoa, couscous, etc).


I made quinoa, rather than rice, as a side dish. To be honest, however, my quinoa failed rather spectacularly. It was a soggy disaster. If you have ever experienced a similar issue, there are some handy tips to be found here:
The wraps were delicious, and the meat mixture was even better the next day.
Because you cook the meat after marinating, however, it might be a good idea to use extra lean ground beef for this recipe. I did find the mixture I made was a little greasy (not that it tasted bad, mind you!).
Saturday, July 12, 2014
Death By Chocolate
Another dessert post! It's not all we have been cooking around here, but life has been busy so most of our meals have been pretty quick'n'dirty, not exactly blog-worthy.
However, recently my husband got another year older and I made him my famous lasagna and his favourite indulgent dessert - "Death By Chocolate". It seemed like a good opportunity to get back on the ol' blog bandwagon.


Bake the cake the day before you wish to serve the dessert.
While the cake is still warm, poke holes in it (see above) and drench in Kahlua. Feel free to sample from snifter as you do this.
The next day, you are going to create a layer dish in a large bowl (a punch bowl works well, although as you can tell from the pictures I didn't have anything that fancy at the time I made this).

Crumble the cake. Break Skor bars into small pieces and crumble into whipped topping. Layer in bowl as follows:

This recipe was included in a book of family recipes given to me by my mother-in-law. I'm pretty sure you'll be seeing other dishes from her collection in future blog posts.
However, recently my husband got another year older and I made him my famous lasagna and his favourite indulgent dessert - "Death By Chocolate". It seemed like a good opportunity to get back on the ol' blog bandwagon.
Recipe:
1 chocolate cake from mix
(although you could probably substitute a homemade one, if you want to do the extra work! I didn't)
1 cup Kahlua
(and a small snifter for sampling!)
1 lg container Cool Whip OR 2 cups whipped cream
4 boxes Dr. Oetker Chocolate Mousse
(again, you probably could substitute for homemade, but I just used the delicious easy-make variety, and it works great!)
6 Skor Bars
(no substitutions here!)
Bake the cake the day before you wish to serve the dessert.
While the cake is still warm, poke holes in it (see above) and drench in Kahlua. Feel free to sample from snifter as you do this.
The next day, you are going to create a layer dish in a large bowl (a punch bowl works well, although as you can tell from the pictures I didn't have anything that fancy at the time I made this).
Cake---Mousse---Whipped Topping
Repeat until all ingredients are used up, ending with the Whipped Topping layer.
If you managed not to eat them all, you can crumble any extra Skor bar bits onto the top for a little extra sweet fanciness. Chill, then serve to the delight of all who are there to enjoy it.
Monday, June 16, 2014
Kid Friendly Munchies
As parents in today's hectic world, I think we all struggle to find healthy, easy snacks that our children will actually eat.
Lately I have found myself guilty of feeding my son goldfish crackers and fruit cups more than I care to admit. I am making it a goal to find some better things to feed my son when he needs a quick pick me up.
Below are some quick and easy suggestions for kid-friendly snacks, found on that always fun and often frustrating site, Pinterest:
Zucchini chips (trying these tonight!)
Whole Fruit Popsicles (if you click on the link on the Pin, you will find a great blog entry with lots of yummy ideas for snacks)
Banana Roll-Ups (a non-processed food that kids will like as much as the store-bought fruit roll ups!)
Homemade Gummy Fruit Snacks (for those parents feeling a bit more adventurous!)
Apple Oatmeal Muffins (a little more traditional, but always a fav)
For the more creative parents:
A Very Hungry Caterpillar
Cute Little Penguins
If you want to see the entire board, or follow me on Pinterest, the link is here:
http://www.pinterest.com/vallyncia/kid-friendly-munchies/
Lately I have found myself guilty of feeding my son goldfish crackers and fruit cups more than I care to admit. I am making it a goal to find some better things to feed my son when he needs a quick pick me up.
Below are some quick and easy suggestions for kid-friendly snacks, found on that always fun and often frustrating site, Pinterest:
Zucchini chips (trying these tonight!)
Whole Fruit Popsicles (if you click on the link on the Pin, you will find a great blog entry with lots of yummy ideas for snacks)
Banana Roll-Ups (a non-processed food that kids will like as much as the store-bought fruit roll ups!)
Homemade Gummy Fruit Snacks (for those parents feeling a bit more adventurous!)
Apple Oatmeal Muffins (a little more traditional, but always a fav)
For the more creative parents:
A Very Hungry Caterpillar
Cute Little Penguins
If you want to see the entire board, or follow me on Pinterest, the link is here:
http://www.pinterest.com/vallyncia/kid-friendly-munchies/
Monday, February 24, 2014
Peanut Butter Cups of Awesome
In my house we celebrate Valentine's Day with homemade chocolates, and these Peanut Butter Cups are always requested.
I found the recipe years ago on Craftster (original post here) and it was an instant favourite with my husband.
Below is my mini-tutorial on making them.
Enjoy!


I found the recipe years ago on Craftster (original post here) and it was an instant favourite with my husband.
Below is my mini-tutorial on making them.
Enjoy!
In a large mixing bowl combine
1 cup peanut butter (I like smooth)
6 tablespoons butter (softened)
2 cups icing sugar
Using a dough cutter cut the ingredients together til crumbly
Then I squish them into little pucks (see picture below)
Then I take good quality milk chocolate (I like Berard Callebaut), chop it up, and then melt it using the double-boiler method. You use chocolate chips or melting pucks if you prefer, but I find using the chopped bricks taste better.
Melt the chocolate, then pour it into prepared cupcake wrappers. I put a little in the bottom, put the peanut butter puck in, then top with more chocolate.
Once they are done, put them in the fridge to set. I find they taste best, though if served at room temperature.
My husband's Valentine's gift. <3
Tuesday, February 11, 2014
Bacon and Onion Pan Fried Squash
We had a dinner party the other day and I wanted to try something new for a veggie dish. I had bought a couple of squash to serve but, as we were serving a turkey, the oven was busy so roasting was not an option. I had to find something else to do, so I Googled "sauteeing". A recipe for squash fried with bacon came up and PRESTO! We had a winner.
The inspiring recipe is here: Butternut Squash Saute (Betty Crocker), but as you can see, I made a few changes:
Ingredients:
2 medium squash, peeled and cut into cubes (I used butternut and acorn)
1/2 pack bacon
1/2 large red onion, chopped
Thyme
Salt & Pepper


The inspiring recipe is here: Butternut Squash Saute (Betty Crocker), but as you can see, I made a few changes:
Ingredients:
2 medium squash, peeled and cut into cubes (I used butternut and acorn)
1/2 pack bacon
1/2 large red onion, chopped
Thyme
Salt & Pepper
To prep the squash, put it in the microwave for about five minutes to cut and peel more easily.
Cube into 1/2 inch pieces and set aside.
Chop bacon into small pieces and fry until it starts to crisp.
Add chopped onion.
Fry for a couple minutes, then add squash, thyme, salt, and pepper.
Fry until squash is fully cooked. You will know that it is ready when you can easily slice through it with a spatula.
Serve! It's delicious and super easy.
And some pictures of our entire turkey dinner (MMMMM!). I made the yummy Quinoa salad mentioned in another blog post and even my husband liked it (he's generally hesitant about "weird grains").
Sunday, December 29, 2013
Christmas Goodies
As always this year the month of December was spent mainly in the kitchen creating lots of candies to give to loved ones.
This year we did truffles, caramels, salted caramel candy (a.k.a. Christmas Crack), and fudge.
I do have a link on my website that shows some of the candy creations I have made in previous years (you can find that at http://tldrover.webs.com/candycrafting.htm), but this year I figured I would compile some of my favorite recipes from 2014.
So here are the recipes for my famous caramels (everyone loves'em, especially dipped in chocolate!), Christmas Crack (courtesy of the find creators over at Craftster), and the yummiest PB fudge ever.
I hope you enjoy! I know they are a little late for the holiday season this year but save these for next year (or Valentine's Day, birthdays, or any days that end in "y"!).
Caramels
Here is the link to the original recipe: http://allrecipes.com/Recipe/Caramels/Detail.aspx

Original recipe makes 4 to 5 dozen caramels


1 cup butter (salted)
1 11.5 oz. package chocolate chips
3/4 cup chopped pecans or almonds (optional)
Preheat the oven to 400 degrees, and line a 10" x 15" cookie sheet with foil (the kind of sheet that has raised edges!). Spray with Pam, or grease VERY lightly with butter. Cover the cookie sheet with a single layer of crackers. Bring butter and brown sugar to a boil. Boil for 3 minutes, stirring with a whisk. Pour over the saltines, and try to spread it as evenly as possible. Place in the oven and bake for 5 minutes. When you remove it, the caramel mixture will be molten and boiling; allow to cool until you can see the crackers distinctly, which will have shifted while baking. Push them back into order with a fork or knife.

(I also use peanut butter chips instead of peanut butter because it is a lot easier.)

This year we did truffles, caramels, salted caramel candy (a.k.a. Christmas Crack), and fudge.
I do have a link on my website that shows some of the candy creations I have made in previous years (you can find that at http://tldrover.webs.com/candycrafting.htm), but this year I figured I would compile some of my favorite recipes from 2014.
So here are the recipes for my famous caramels (everyone loves'em, especially dipped in chocolate!), Christmas Crack (courtesy of the find creators over at Craftster), and the yummiest PB fudge ever.
I hope you enjoy! I know they are a little late for the holiday season this year but save these for next year (or Valentine's Day, birthdays, or any days that end in "y"!).
Caramels

Directions
You NEED a candy thermometer for this recipe. Also, if you want the caramels to be able to be solid at room temperature you need to boil them for a minute at 250oF, until the caramel darkens a bit (but stop before it burns!).
Since I usually dip my caramels in chocolate I like them a bit softer so I take them off the heat when it reaches the max temperature. This will NOT give you a solid caramel candy, however.
Once recipe makes A LOT of caramels. I made two batches this year and I still have almost a pound of caramel in my freezer waiting to be dipped in chocolate.

This is what the caramel looks like at 250oF, right after it is poured into the dish.

This is what the caramel looks like after it has set, if you let it boil a bit longer. Note the darker colour.
Christmas Crack - Salted Caramel Candy

This recipe is super cheap, quick, easy, and makes great gifts (and no one will ever know how cheap, quick, easy it is!).
The original recipe for this is from Craftster and can be found at this link.
1 sleeve saltine (soda) crackers - I typically use salted.
3/4 cup brown sugar1 cup butter (salted)
1 11.5 oz. package chocolate chips
3/4 cup chopped pecans or almonds (optional)
Preheat the oven to 400 degrees, and line a 10" x 15" cookie sheet with foil (the kind of sheet that has raised edges!). Spray with Pam, or grease VERY lightly with butter. Cover the cookie sheet with a single layer of crackers. Bring butter and brown sugar to a boil. Boil for 3 minutes, stirring with a whisk. Pour over the saltines, and try to spread it as evenly as possible. Place in the oven and bake for 5 minutes. When you remove it, the caramel mixture will be molten and boiling; allow to cool until you can see the crackers distinctly, which will have shifted while baking. Push them back into order with a fork or knife.
Sprinkle the chocolate chips over the toffee and let sit for about 5 minutes to melt. Do not wait too long to pour the chips as this can create problems!
Once melted spread chocolate evenly. If desired, sprinkle on pecans/almonds and press lightly into the chocolate.* Let cool a bit and then transfer to fridge to harden.

And now, for the last recipe,
PEANUT BUTTER FUDGE!
I used this recipe, but made a fairly dramatic change to it.
Original recipe makes 1 - 8x8 inch pan
(I also use peanut butter chips instead of peanut butter because it is a lot easier.)
Directions
After it is ready, I cut it into chunks and package it up all pretty for Christmas presents :)

Happy holidays and wishing you and yours all the best in 2014!
Monday, November 18, 2013
The Best Banana Muffins Ever!
This is a shout out to "Cat Can Cook". Her blog is found here:
http://www.catcancook.com/awesome-banana-muffin-recipe/
I love this recipe. I have been using it for years now (I pretty much have it memorized) and it is a family favourite. I usually add chocolate chips and walnuts to make them a little more treat-like. They are also a big hit at potlucks and for making friends with co-workers!
http://www.catcancook.com/awesome-banana-muffin-recipe/
I love this recipe. I have been using it for years now (I pretty much have it memorized) and it is a family favourite. I usually add chocolate chips and walnuts to make them a little more treat-like. They are also a big hit at potlucks and for making friends with co-workers!
Banana Muffins (makes 12 muffins)
3 or 4 Large bananas, mashed (the more bananas the moister, so I use 4; I also use overripe bananas so they are a bit sweeter)
1/2 cup white sugar
1 slightly beaten egg
1/3 cup melted margarine or butter
1 teaspoon baking soda
1 teaspoon baking powder
1/2 teaspoon salt
1 1/2 cups flour
Mash up the bananas. If you want to avoid them turning black you can add a little lemon juice, but I don't bother. I find it hides some of the banana-y flavour.
Add the sugar. Mix. Add the egg. Mix. Add the margarine/butter. Mix. Make sure the margarine/butter is no warmer than room temperature when you add it, or the egg will cook and you will end up with really weird muffins. I've done it.
In a separate bowl, combine flour, baking soda, baking powder, and salt. Add to the wet ingredients, being careful not to over mix. At this point I generally add my chocolate chips and walnuts. YUM!
Pour into greased muffin tins, and bake in 350 degrees F oven for approximately 20 minutes. Keep an eye on them, though. I find that these puppies can cook fast.
They are perfect for school lunches. You can freeze them for a later date. And they are really good with a morning cup of coffee. They only take about ten minutes to make, less than 20 to bake, and the clean up is pretty quick. They are also a great recipe for teaching the small ones how to create in the kitchen.


Wednesday, September 18, 2013
Super E-Z "Greek" Salad
MMMM! It's still summer (barely) and we still have lots of fresh local produce available here on the west coast.
Why not use some of those juicy tomatoes and crisp cucumbers for some super easy "Greek" style salad?
Ingredients:
2-3 large tomatoes
1 large cucumber
Red, green, yellow, orange peppers (1 of each)
1 large red onion
1 cup kalamata olives (pitted or with pits, your choice!)
1 cup feta cheese (or more, if you like ;) )
Dressing -
1/2 cup balsamic vinegar
1/4 cup olive oil
2 cloves crushed garlic
1 tsp dijon mustard
Salt, pepper to taste
Chop all the veggies into 1/4 inch cubes (as per picture below).
Whisk dressing together in bowl, set aside. If you make this in advance (up to 24 hours) it brings the flavours out nicely.


Toss the veggies in the dressing, add olives, and top with feta cheese.
Enjoy!
Why not use some of those juicy tomatoes and crisp cucumbers for some super easy "Greek" style salad?
Ingredients:
2-3 large tomatoes
1 large cucumber
Red, green, yellow, orange peppers (1 of each)
1 large red onion
1 cup kalamata olives (pitted or with pits, your choice!)
1 cup feta cheese (or more, if you like ;) )
Dressing -
1/2 cup balsamic vinegar
1/4 cup olive oil
2 cloves crushed garlic
1 tsp dijon mustard
Salt, pepper to taste
Chop all the veggies into 1/4 inch cubes (as per picture below).
Whisk dressing together in bowl, set aside. If you make this in advance (up to 24 hours) it brings the flavours out nicely.

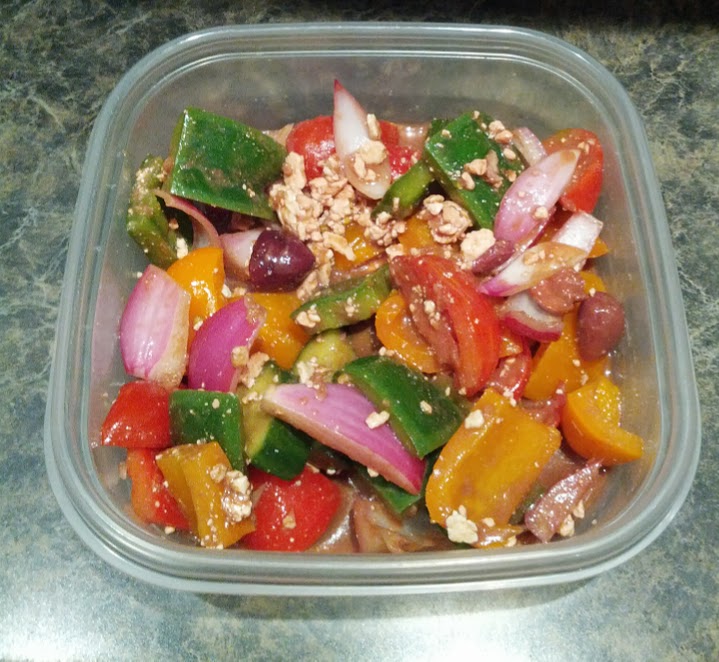
Toss the veggies in the dressing, add olives, and top with feta cheese.
Enjoy!
Thursday, August 29, 2013
Portobello Mushroom Burgers
We just bought a new BBQ and to celebrate we had our family over to enjoy some burgers.
My sister, however, does not eat red meat so for her we made something a little different - portobello mushroom burgers. Super simple, super delicious, and just as wonderful as the beef counterparts.
Ingredients:
Portabello Mushrooms (1 per burger)
Balsamic vinegar
Olive Oil
Sage
Basil
Oregano
Thyme
Salt
Pepper
Garlic
Mustard
Cheese (Cheddar or Havarti)
Mix vinegar, oil, herbs, and spices into a marinade.
Soak the mushrooms in the marinade for up to 24 hours in the fridge.
Spark up the barbie and grill the mushroom topped with your choice of cheese for 5-8 minutes, long enough to warm it through and get those lovely grill marks on it.
This is a super easy and a healthy alternative to those over processed tofu and mushroom burgers you buy at the store.
And they are great with all the fixings - bun, pickles, tomatoes, lettuce, or even guacamole (as pictured below).

My sister, however, does not eat red meat so for her we made something a little different - portobello mushroom burgers. Super simple, super delicious, and just as wonderful as the beef counterparts.
Ingredients:
Portabello Mushrooms (1 per burger)
Balsamic vinegar
Olive Oil
Sage
Basil
Oregano
Thyme
Salt
Pepper
Garlic
Mustard
Cheese (Cheddar or Havarti)
Mix vinegar, oil, herbs, and spices into a marinade.
Soak the mushrooms in the marinade for up to 24 hours in the fridge.
Spark up the barbie and grill the mushroom topped with your choice of cheese for 5-8 minutes, long enough to warm it through and get those lovely grill marks on it.
This is a super easy and a healthy alternative to those over processed tofu and mushroom burgers you buy at the store.
And they are great with all the fixings - bun, pickles, tomatoes, lettuce, or even guacamole (as pictured below).
Monday, July 22, 2013
Vegetarian Mushroom Lasagna and **BONUS** Ceaser Salad Dressing Recipe
What could be better than lasagna with two different kinds of meat? Well, if you are a vegetarian, how about a lasagna with two different kinds of mushrooms and absolutely no meat?! I actually preferred this one, although my husband (a tried and true carnivore) did prefer the double meat variety. I found that using the Portobello mushrooms added the right amount of flavour and consistency so you could avoid using any of the nasty processed soy-based meat substitution products.
This is definitely not vegan (I'm back on the dairy wagon!) but of course you could always substitute vegan cheese for the cow's milk variety if you so chose and forgo the egg. The big thing in this is all the veggies!
This only makes a small dish (as per the pictures). Just double everything if you want more pasta perfection.
Ingredients:
1/2 package lasagna noodles
2 tablespoons olive oil
2 large Portobello mushrooms
6 large white mushrooms
1 pepper (any colour, whatever your preference)
1 onion (your choice of variety)
1/4 cup broccoli
1 small zucchini
2 cups marinara sauce (homemade or canned)
1 package frozen spinach (you can use fresh but I used frozen, make sure you drain it well!)
1 egg
1 cup ricotta cheese
1 cup cheddar cheese
1 cup mozzarella cheese
1/2 cup Parmesan cheese
Herbs and Spices (to taste) - I use oregano, basil, sage, thyme, rosemary,salt, pepper, etc. Fresh or dried.
Cook all the veggies in a large pan in the olive oil until just softened. Add marinara sauce and spices. Allow to simmer at a low temperature for about half an hour (until veggies are cooked and the flavours are coming out). If you prefer crisper veggies, don't pre-cook them before adding the sauce.
Once your sauce is cooked, combine the spinach, ricotta, and egg. I added a bit of cheddar and mozza to this layer as well, to make the lasagna extra cheesy!
Now is the fun part! Time to layer
Start with the marinara sauce. Add noodles. Then ricotta, sauce, noodles. Ricotta, sauce, noodles. And, finally, cheese! Lots and lots and lots of cheese.
Throw this concoction of awesome into the oven at 350oC for about forty minutes. Check relatively frequently. You want the cheese to be melted and a bit crunchy but (obviously) not burnt. (Burned?)


And now...my bonus Ceaser dressing recipe!
1/2 cup mayo
1/4 cup Parmesan cheese
2 tbsp Dijon mustard
2 tbsp lemon juice
Worcestershire sauce (to taste)
5-6 cloves (lots and lots!) of fresh garlic
salt and pepper
Up to 1/4 cup milk
Mix all ingredients, leave milk to last so you can add just enough to make the dressing your desired consistency.
Add to fresh romaine lettuce, croutons, and top the mixture with even more parm cheese. For a veggie boost I also add cucumbers, mushrooms, and green onions to my Ceaser salad.

This is definitely not vegan (I'm back on the dairy wagon!) but of course you could always substitute vegan cheese for the cow's milk variety if you so chose and forgo the egg. The big thing in this is all the veggies!
This only makes a small dish (as per the pictures). Just double everything if you want more pasta perfection.
Ingredients:
1/2 package lasagna noodles
2 tablespoons olive oil
2 large Portobello mushrooms
6 large white mushrooms
1 pepper (any colour, whatever your preference)
1 onion (your choice of variety)
1/4 cup broccoli
1 small zucchini
2 cups marinara sauce (homemade or canned)
1 package frozen spinach (you can use fresh but I used frozen, make sure you drain it well!)
1 egg
1 cup ricotta cheese
1 cup cheddar cheese
1 cup mozzarella cheese
1/2 cup Parmesan cheese
Herbs and Spices (to taste) - I use oregano, basil, sage, thyme, rosemary,salt, pepper, etc. Fresh or dried.
Cook all the veggies in a large pan in the olive oil until just softened. Add marinara sauce and spices. Allow to simmer at a low temperature for about half an hour (until veggies are cooked and the flavours are coming out). If you prefer crisper veggies, don't pre-cook them before adding the sauce.
Once your sauce is cooked, combine the spinach, ricotta, and egg. I added a bit of cheddar and mozza to this layer as well, to make the lasagna extra cheesy!
Now is the fun part! Time to layer
Start with the marinara sauce. Add noodles. Then ricotta, sauce, noodles. Ricotta, sauce, noodles. And, finally, cheese! Lots and lots and lots of cheese.
Throw this concoction of awesome into the oven at 350oC for about forty minutes. Check relatively frequently. You want the cheese to be melted and a bit crunchy but (obviously) not burnt. (Burned?)


And now...my bonus Ceaser dressing recipe!
1/2 cup mayo
1/4 cup Parmesan cheese
2 tbsp Dijon mustard
2 tbsp lemon juice
Worcestershire sauce (to taste)
5-6 cloves (lots and lots!) of fresh garlic
salt and pepper
Up to 1/4 cup milk
Mix all ingredients, leave milk to last so you can add just enough to make the dressing your desired consistency.
Add to fresh romaine lettuce, croutons, and top the mixture with even more parm cheese. For a veggie boost I also add cucumbers, mushrooms, and green onions to my Ceaser salad.

Sunday, June 23, 2013
La La La La La Lasagna!
For my wonderful husband's birthday I made him a delicious double meat, four cheese lasagna. I didn't use a recipe but somehow it still turned out pretty darn fabulous!
Ingredients:
1 package No-Bake lasagna noodles
1 package ground beef
1 package sausages
1 green pepper
1 zucchini
1 yellow onion
6-8 mushrooms
1 tub unripened Ricotta cheese
1 package frozen spinach (fresh would probably work too)
1 egg
1 large can marinara sauce (or use homemade)
3-4 cloves garlic
Herbs (rosemary, sage, oregano, basil, mustard, etc)
~1 cup mozzarella cheese
~1 cup cheddar cheese
1/2 cup parmesan cheese
First, the sauce:
Brown the meat (ground beef and sausages) in a large pan. Fry off or drain all the fat. Add veggies. Saute for five minutes, then add the marinara sauce, garlic, and season to taste. Allow to simmer.
Then, the ricotta cheese and spinach layer:
Combine the ricotta cheese, spinach, and egg in a large bowl. I also added a bit of mozza and cheddar to this layer.
Finally, put it all together:
Sauce
Noodles
Ricotta
Sauce
Noodles
Ricotta
Sauce
Noodles
Cheese! Cheese! Cheese!
Bake at 350oC for about 40 minutes, or until the cheese is nice and crispy and browning.
.jpg)
.jpg)
.jpg)
Coming next - veggie lasagna and caesar salad with homemade dressing. Mmmmmm!
Ingredients:
1 package No-Bake lasagna noodles
1 package ground beef
1 package sausages
1 green pepper
1 zucchini
1 yellow onion
6-8 mushrooms
1 tub unripened Ricotta cheese
1 package frozen spinach (fresh would probably work too)
1 egg
1 large can marinara sauce (or use homemade)
3-4 cloves garlic
Herbs (rosemary, sage, oregano, basil, mustard, etc)
~1 cup mozzarella cheese
~1 cup cheddar cheese
1/2 cup parmesan cheese
First, the sauce:
Brown the meat (ground beef and sausages) in a large pan. Fry off or drain all the fat. Add veggies. Saute for five minutes, then add the marinara sauce, garlic, and season to taste. Allow to simmer.
Then, the ricotta cheese and spinach layer:
Combine the ricotta cheese, spinach, and egg in a large bowl. I also added a bit of mozza and cheddar to this layer.
Finally, put it all together:
Sauce
Noodles
Ricotta
Sauce
Noodles
Ricotta
Sauce
Noodles
Cheese! Cheese! Cheese!
Bake at 350oC for about 40 minutes, or until the cheese is nice and crispy and browning.
.jpg)
.jpg)
.jpg)
Coming next - veggie lasagna and caesar salad with homemade dressing. Mmmmmm!
Wednesday, May 29, 2013
Odin's Strawberry Shortcake
I had a guest cook help me out with this blog entry :) Thanks to Odin for all of his help!
My wonderful stepson wanted to make strawberry shortcake the other day. He had a recipe from a book that he wanted to try.
I helped him with the measurements and a few other small things (mixing techniques and anything to do with the oven) but overall he made the delicious dessert all by himself.
I would ease off a bit on the baking powder and be prepared for a dessert that isn't quite as light and fluffy as the sponge cakes you often use for strawberry shortcake. This actually tastes more like a biscuit. Our family loved it, and the nice thing about it is that it will last for a day in the fridge.
The recipe is from "Cook a Doodle Doo", which you can purchase here (it's a great book!)
http://www.amazon.ca/Cook-A-Doodle-Doo-Janet-Stevens/dp/0152019243
Here is the recipe if you want to try it at home:
2 cups all purpose flour
2 tablespoons sugar
1 tablespoon baking powder
1/2 teaspoon salt
1/2 cup butter
1 egg, beaten
2/3 cup milk
3-4 cups fresh strawberries, washed and sliced
1 cup whipped cream
Preheat oven to 450 degrees fahrenheit. Sift together dry ingrediants. Cut in butter until mixture resembles coarse crumbs. Add egg and milk, stirring just enough to moisten. Spread dough into an 8"x 1 1/2" pan (I actually usually use a 9" cake pan), building up the edges, and allow to bake for 15 - 18 minutes. Allow to cool on a rack. The recipe suggests that you cut the cake in half and layer, but I usually just put the whipped cream and strawberries on top. If you have the appropriate pan (the 8" one) the layer option might work better, but I have always found that the cake is too crumbly to cut in half. Either way, it tastes great!


My wonderful stepson wanted to make strawberry shortcake the other day. He had a recipe from a book that he wanted to try.
I helped him with the measurements and a few other small things (mixing techniques and anything to do with the oven) but overall he made the delicious dessert all by himself.
I would ease off a bit on the baking powder and be prepared for a dessert that isn't quite as light and fluffy as the sponge cakes you often use for strawberry shortcake. This actually tastes more like a biscuit. Our family loved it, and the nice thing about it is that it will last for a day in the fridge.
The recipe is from "Cook a Doodle Doo", which you can purchase here (it's a great book!)
http://www.amazon.ca/Cook-A-Doodle-Doo-Janet-Stevens/dp/0152019243
Here is the recipe if you want to try it at home:
2 cups all purpose flour
2 tablespoons sugar
1 tablespoon baking powder
1/2 teaspoon salt
1/2 cup butter
1 egg, beaten
2/3 cup milk
3-4 cups fresh strawberries, washed and sliced
1 cup whipped cream
Preheat oven to 450 degrees fahrenheit. Sift together dry ingrediants. Cut in butter until mixture resembles coarse crumbs. Add egg and milk, stirring just enough to moisten. Spread dough into an 8"x 1 1/2" pan (I actually usually use a 9" cake pan), building up the edges, and allow to bake for 15 - 18 minutes. Allow to cool on a rack. The recipe suggests that you cut the cake in half and layer, but I usually just put the whipped cream and strawberries on top. If you have the appropriate pan (the 8" one) the layer option might work better, but I have always found that the cake is too crumbly to cut in half. Either way, it tastes great!


Sunday, April 28, 2013
Honey Garlic Chicken
A quick and easy chicken dish that pleases both grown up and more child-like palettes. The best part of this dish is its simplicity.
Ingredients:
4 - 6 pieces chicken (thighs or drumsticks, enough to feed four people)
1/2 cup honey
2 cloves fresh garlic, minced
3 tablespoons olive oil
Preheat oven to 400oC. Place chicken in oven safe dish (I use a glass Pyrex dish). Mix together honey, garlic, and olive oil. Drizzle over chicken. Flip chicken to ensure that the meat is fully covered by the sauce. Bake in the oven for 20 - 30 minutes, until chicken is fully cooked. My husband also recommends basting the chicken every five minutes to ensure that the meat is perfectly golden-brown when it is done cooking.
I served with roast potatoes (you can cook these in the oven with the chicken) and steamed broccoli. Yum!


This recipe has been adapted from this posting on the My Fridge Food blog.
Ingredients:
4 - 6 pieces chicken (thighs or drumsticks, enough to feed four people)
1/2 cup honey
2 cloves fresh garlic, minced
3 tablespoons olive oil
Preheat oven to 400oC. Place chicken in oven safe dish (I use a glass Pyrex dish). Mix together honey, garlic, and olive oil. Drizzle over chicken. Flip chicken to ensure that the meat is fully covered by the sauce. Bake in the oven for 20 - 30 minutes, until chicken is fully cooked. My husband also recommends basting the chicken every five minutes to ensure that the meat is perfectly golden-brown when it is done cooking.
I served with roast potatoes (you can cook these in the oven with the chicken) and steamed broccoli. Yum!


This recipe has been adapted from this posting on the My Fridge Food blog.
Friday, April 19, 2013
Crazy Good Coconutty Granola
One of the yummiest and easiest breakfasts to make is homemade granola. And the variations are endless - just add whatever combination of nuts, fruit, seeds, and other goodies to create your own special concoction. Below is a recipe for a coconut granola I made the other day. Delicious!
6 cups rolled oats
1/2 cup coconut oil
1/2 cup honey
1 cup almonds
1 cup craisins
1 cup raisins
1 cup coconut shreddings
Mix the rolled oats, oil, and honey together until the oats are covered evenly. If you find that the oats are not coated enough, you can add a tablespoon or two more oil as needed. Then add all the goodies and toss together.
Preheat oven to 300 degrees Celcius. Pour mixture onto cookie sheet. I usually cover the cookie sheet with parchment paper so the mixture cooks evenly and to make it easier to pour the mixture into a container after it is baked.
Put the pan in the oven and bake for about 10 minutes but keep a VERY close eye on it. Take out and stir about half way through to ensure that the mixture browns evenly.
Once done, wait until it cools and then put into an airtight container. If you keep the granola on the shelf it will last about a week, or for longer life you can keep it in the fridge or freezer.
To enjoy, just add milk, yogurt, or whatever your pleasure (currently I am using almond milk) and dig in.


 .......after baking.
6 cups rolled oats
1/2 cup coconut oil
1/2 cup honey
1 cup almonds
1 cup craisins
1 cup raisins
1 cup coconut shreddings
Mix the rolled oats, oil, and honey together until the oats are covered evenly. If you find that the oats are not coated enough, you can add a tablespoon or two more oil as needed. Then add all the goodies and toss together.
Preheat oven to 300 degrees Celcius. Pour mixture onto cookie sheet. I usually cover the cookie sheet with parchment paper so the mixture cooks evenly and to make it easier to pour the mixture into a container after it is baked.
Put the pan in the oven and bake for about 10 minutes but keep a VERY close eye on it. Take out and stir about half way through to ensure that the mixture browns evenly.
Once done, wait until it cools and then put into an airtight container. If you keep the granola on the shelf it will last about a week, or for longer life you can keep it in the fridge or freezer.
To enjoy, just add milk, yogurt, or whatever your pleasure (currently I am using almond milk) and dig in.

Ingredients.


Before baking...

Monday, April 1, 2013
Coconut Milk Curry with Prawns

Ingredients (feeds six people):
1 pkg frozen or fresh raw Prawns
2 tbsp olive oil
1 cup carrots
1 cup broccoli
1 medium white onion
2 peppers (I used orange and red for colour)
1 small zucchini
1 cup mushrooms
2 bunches bok choy
~ 1 tbsp each minced fresh garlic and ginger (you can add as much or as little as your taste buds prefer)
2 cans Coconut Milk
Curry Powder (to taste)
Salt and Pepper
2 portions instant stir fry noodles (or you can cook pasta or rice to go with it)
Defrost prawns (if necessary) in cool water. De-shell them (again if necessary) and set aside.
Chop all veggies into desired size. I find everyone has their preferences when it comes to stir fry :)
Once everything is prepped, turn on a large skillet, frying pan, or wok to medium and heat up the olive oil. Add carrots, cook slightly (1-2 mins), then add broccoli, cook slightly, and continue on down the list until all veggies - except the bok choy - are cooking in the oil.
Add the two cans of coconut milk, the garlic, the ginger, and start adding the spices to taste. Allow the mixture to simmer for a minute. Then add the stir fry noodles (if you are using the instant variety) and bok choy. When everything is almost done (probably about five minutes, but keep an eye on the mixture, as it depends a lot on your pan, the size of your veggies, etc) add the prawns and cook until they turn pink, about a minute or two. Try not to overcook as they can get rubbery.
And TA DA! You have just created a healthy (albeit it a little bit fattening) well balanced meal in a single dish.
If you want to reduce the fat content, use lower fat coconut milk instead of the full fat variety.
Subscribe to:
Posts (Atom)