Sunday, December 29, 2013

Christmas Goodies

As always this year the month of December was spent mainly in the kitchen creating lots of candies to give to loved ones.
This year we did truffles, caramels, salted caramel candy (a.k.a. Christmas Crack), and fudge.
I do have a link on my website that shows some of the candy creations I have made in previous years (you can find that at http://tldrover.webs.com/candycrafting.htm), but this year I figured I would compile some of my favorite recipes from 2014.
So here are the recipes for my famous caramels (everyone loves'em, especially dipped in chocolate!), Christmas Crack (courtesy of the find creators over at Craftster), and the yummiest PB fudge ever.
I hope you enjoy! I know they are a little late for the holiday season this year but save these for next year (or Valentine's Day, birthdays, or any days that end in "y"!).

Caramels
 Here is the link to the original recipe: http://allrecipes.com/Recipe/Caramels/Detail.aspx


 Original recipe makes 4 to 5 dozen caramels

Directions


  1. Grease a 12x15 inch pan.
  2. In a medium-size pot, combine sugar, brown sugar, corn syrup, evaporated milk, whipping cream, and butter. Monitor the heat of the mixture with a candy thermometer while stirring. When the thermometer reaches 250 degrees F (120 degrees C) remove the pot from the heat.
  3. Stir in vanilla. Transfer mixture to the prepared pan and let the mixture cool completely. When cooled cut the Caramel into small squares and wrap them in wax paper for storage.


You NEED a candy thermometer for this recipe. Also, if you want the caramels to be able to be solid at room temperature you need to boil them for a minute at 250oF, until the caramel darkens a bit (but stop before it burns!). 
Since I usually dip my caramels in chocolate I like them a bit softer so I take them off the heat when it reaches the max temperature. This will NOT give you a solid caramel candy, however.

Once recipe makes A LOT of caramels. I made two batches this year and I still have almost a pound of caramel in my freezer waiting to be dipped in chocolate.

This is what the caramel looks like at 250oF, right after it is poured into the dish.

This is what the caramel looks like after it has set, if you let it boil a bit longer. Note the darker colour.


Christmas Crack - Salted Caramel Candy

This recipe is super cheap, quick, easy, and makes great gifts (and no one will ever know how cheap, quick, easy it is!).

The original recipe for this is from Craftster and can be found at this link.

1 sleeve saltine (soda) crackers - I typically use salted.
3/4 cup brown sugar
1 cup butter (salted)
1 11.5 oz. package chocolate chips
3/4 cup chopped pecans or almonds (optional)

Preheat the oven to 400 degrees, and line a 10" x 15" cookie sheet with foil (the kind of sheet that has raised edges!).  Spray with Pam, or grease VERY lightly with butter.  Cover the cookie sheet with a single layer of crackers.  Bring butter and brown sugar to a boil.  Boil for 3 minutes, stirring with a whisk.  Pour over the saltines, and try to spread it as evenly as possible.  Place in the oven and bake for 5 minutes.  When you remove it, the caramel mixture will be molten and boiling; allow to cool until you can see the crackers distinctly, which will have shifted while baking.  Push them back into order with a fork or knife. 
Sprinkle the chocolate chips over the toffee and let sit for about 5 minutes to melt. Do not wait too long to pour the chips as this can create problems!
Once melted spread chocolate evenly.  If desired, sprinkle on pecans/almonds and press lightly into the chocolate.*  Let cool a bit and then transfer to fridge to harden.

And now, for the last recipe, 
PEANUT BUTTER FUDGE!
I used this recipe, but made a fairly dramatic change to it.

Original recipe makes 1 - 8x8 inch pan        


(I also use peanut butter chips instead of peanut butter because it is a lot easier.)

Directions

  1. Melt butter in a medium saucepan over medium heat. Stir in brown sugar and milk. Bring to a boil and boil for 2 minutes, stirring frequently. Remove from heat. Stir in peanut butter and vanilla. Pour over confectioners' sugar in a large mixing bowl. Beat until smooth; pour into an 8x8 inch dish. Chill until firm and cut into squares.


After it is ready, I cut it into chunks and package it up all pretty for Christmas presents :) 

Happy holidays and wishing you and yours all the best in 2014!

Monday, November 18, 2013

The Best Banana Muffins Ever!

This is a shout out to "Cat Can Cook". Her blog is found here:
http://www.catcancook.com/awesome-banana-muffin-recipe/
I love this recipe. I have been using it for years now (I pretty much have it memorized) and it is a family favourite. I usually add chocolate chips and walnuts to make them a little more treat-like. They are also a big hit at potlucks and for making friends with co-workers!

Banana Muffins (makes 12 muffins)
3 or 4 Large bananas, mashed (the more bananas the moister, so I use 4; I also use overripe bananas so they are a bit sweeter)
1/2 cup white sugar 
1 slightly beaten egg
1/3 cup melted margarine or butter
1 teaspoon baking soda
1 teaspoon baking powder
1/2 teaspoon salt
1 1/2 cups flour
Mash up the bananas. If you want to avoid them turning black you can add a little lemon juice, but I don't bother. I find it hides some of the banana-y flavour.
Add the sugar. Mix. Add the egg. Mix. Add the margarine/butter. Mix. Make sure the margarine/butter is no warmer than room temperature when you add it, or the egg will cook and you will end up with really weird muffins. I've done it.
In a separate bowl, combine flour, baking soda, baking powder, and salt. Add to the wet ingredients, being careful not to over mix. At this point I generally add my chocolate chips and walnuts. YUM!
Pour into greased muffin tins, and bake in 350 degrees F oven for approximately 20 minutes. Keep an eye on them, though. I find that these puppies can cook fast.
They are perfect for school lunches. You can freeze them for a later date. And they are really good with a morning cup of coffee. They only take about ten minutes to make, less than 20 to bake, and the clean up is pretty quick. They are also a great recipe for teaching the small ones how to create in the kitchen.


Wednesday, September 18, 2013

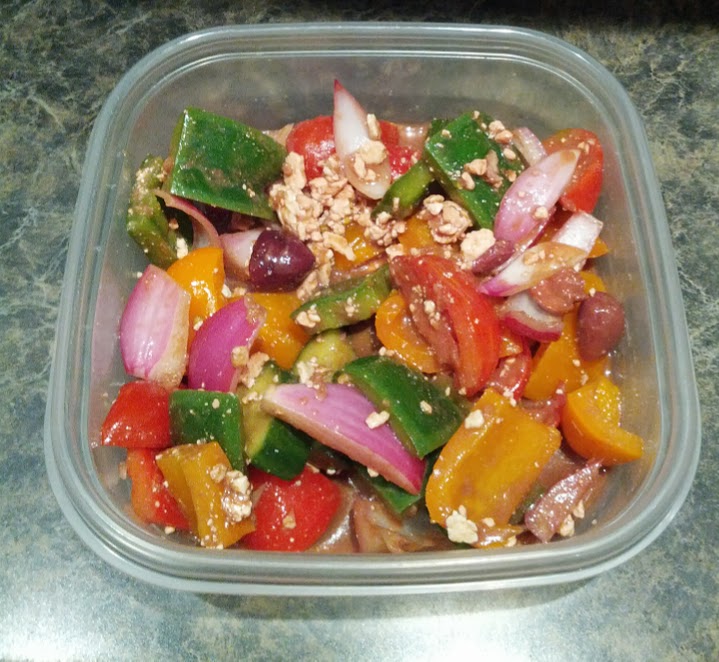
Super E-Z "Greek" Salad

MMMM! It's still summer (barely) and we still have lots of fresh local produce available here on the west coast.
Why not use some of those juicy tomatoes and crisp cucumbers for some super easy "Greek" style salad?

Ingredients:
2-3 large tomatoes
1 large cucumber
Red, green, yellow, orange peppers (1 of each)
1 large red onion
1 cup kalamata olives (pitted or with pits, your choice!)
1 cup feta cheese (or more, if you like ;) )

Dressing -
1/2 cup balsamic vinegar
1/4 cup olive oil
2 cloves crushed garlic
1 tsp dijon mustard
Salt, pepper to taste

Chop all the veggies into 1/4 inch cubes (as per picture below).
Whisk dressing together in bowl, set aside. If you make this in advance (up to 24 hours) it brings the flavours out nicely.


Toss the veggies in the dressing, add olives, and top with feta cheese.

Enjoy!

Thursday, August 29, 2013

Portobello Mushroom Burgers

We just bought a new BBQ and to celebrate we had our family over to enjoy some burgers.
My sister, however, does not eat red meat so for her we made something a little different - portobello mushroom burgers. Super simple, super delicious, and just as wonderful as the beef counterparts.

Ingredients:

Portabello Mushrooms (1 per burger)
Balsamic vinegar
Olive Oil
Sage
Basil
Oregano
Thyme
Salt
Pepper
Garlic
Mustard
Cheese (Cheddar or Havarti)

Mix vinegar, oil, herbs, and spices into a marinade.
Soak the mushrooms in the marinade for up to 24 hours in the fridge.
Spark up the barbie and grill the mushroom topped with your choice of cheese for 5-8 minutes, long enough to warm it through and get those lovely grill marks on it.
This is a super easy and a healthy alternative to those over processed tofu and mushroom burgers you buy at the store.
And they are great with all the fixings - bun, pickles, tomatoes, lettuce, or even guacamole (as pictured below).

Monday, July 22, 2013

Vegetarian Mushroom Lasagna and **BONUS** Ceaser Salad Dressing Recipe

What could be better than lasagna with two different kinds of meat? Well, if you are a vegetarian, how about a lasagna with two different kinds of mushrooms and absolutely no meat?! I actually preferred this one, although my husband (a tried and true carnivore) did prefer the double meat variety. I found that using the Portobello mushrooms added the right amount of flavour and consistency so you could avoid using any of the nasty processed soy-based meat substitution products.

This is definitely not vegan (I'm back on the dairy wagon!) but of course you could always substitute vegan cheese for the cow's milk variety if you so chose and forgo the egg. The big thing in this is all the veggies!

This only makes a small dish (as per the pictures). Just double everything if you want more pasta perfection.

Ingredients:
1/2  package lasagna noodles
2 tablespoons olive oil
2 large Portobello mushrooms
6 large white mushrooms
1 pepper (any colour, whatever your preference)
1 onion (your choice of variety)
1/4 cup broccoli
1 small zucchini
2 cups marinara sauce (homemade or canned)
1 package frozen spinach (you can use fresh but I used frozen, make sure you drain it well!)
1 egg
1 cup ricotta cheese
1 cup cheddar cheese
1 cup mozzarella cheese
1/2 cup Parmesan cheese
Herbs and Spices (to taste) - I use oregano, basil, sage, thyme, rosemary,salt, pepper, etc. Fresh or dried.

Cook all the veggies in a large pan in the olive oil until just softened. Add marinara sauce and spices. Allow to simmer at a low temperature for about half an hour (until veggies are cooked and the flavours are coming out). If you prefer crisper veggies, don't pre-cook them before adding the sauce.

Once your sauce is cooked, combine the spinach, ricotta, and egg. I added a bit of cheddar and mozza to this layer as well, to make the lasagna extra cheesy!

Now is the fun part! Time to layer
Start with the marinara sauce. Add noodles. Then ricotta, sauce, noodles. Ricotta, sauce, noodles. And, finally, cheese! Lots and lots and lots of cheese.

Throw this concoction of awesome into the oven at 350oC for about forty minutes. Check relatively frequently. You want the cheese to be melted and a bit crunchy but (obviously) not burnt. (Burned?)


And now...my bonus Ceaser dressing recipe!

1/2 cup mayo
1/4 cup Parmesan cheese
2 tbsp Dijon mustard
2 tbsp lemon juice
Worcestershire sauce (to taste)
5-6 cloves (lots and lots!) of fresh garlic
salt and pepper
Up to 1/4 cup milk

Mix all ingredients, leave milk to last so you can add just enough to make the dressing your desired consistency.
Add to fresh romaine lettuce, croutons, and top the mixture with even more parm cheese. For a veggie boost I also add cucumbers, mushrooms, and green onions to my Ceaser salad.


Sunday, June 23, 2013

La La La La La Lasagna!

For my wonderful husband's birthday I made him a delicious double meat, four cheese lasagna. I didn't use a recipe but somehow it still turned out pretty darn fabulous!

Ingredients:

1 package No-Bake lasagna noodles
1 package ground beef
1 package sausages
1 green pepper
1 zucchini
1 yellow onion
6-8 mushrooms
1 tub unripened Ricotta cheese
1 package frozen spinach (fresh would probably work too)
1 egg
1 large can marinara sauce (or use homemade)
3-4 cloves garlic
Herbs (rosemary, sage, oregano, basil, mustard, etc)
~1 cup mozzarella cheese
~1 cup cheddar cheese
1/2 cup parmesan cheese


First, the sauce:
Brown the meat (ground beef and sausages) in a large pan. Fry off or drain all the fat. Add veggies. Saute for five minutes, then add the marinara sauce, garlic, and season to taste. Allow to simmer.

Then, the ricotta cheese and spinach layer:
Combine the ricotta cheese, spinach, and egg in a large bowl. I also added a bit of mozza and cheddar to this layer.

Finally, put it all together:

Sauce
Noodles
Ricotta
Sauce
Noodles
Ricotta
Sauce
Noodles
Cheese! Cheese! Cheese!

Bake at 350oC for about 40 minutes, or until the cheese is nice and crispy and browning.


Coming next - veggie lasagna and caesar salad with homemade dressing. Mmmmmm!

Wednesday, May 29, 2013

Odin's Strawberry Shortcake

I had a guest cook help me out with this blog entry :) Thanks to Odin for all of his help!

My wonderful stepson wanted to make strawberry shortcake the other day. He had a recipe from a book that he wanted to try.

I helped him with the measurements and a few other small things (mixing techniques and anything to do with the oven) but overall he made the delicious dessert all by himself.

I would ease off a bit on the baking powder and be prepared for a dessert that isn't quite as light and fluffy as the sponge cakes you often use for strawberry shortcake. This actually tastes more like a biscuit. Our family loved it, and the nice thing about it is that it will last for a day in the fridge.

The recipe is from "Cook a Doodle Doo", which you can purchase here (it's a great book!)
http://www.amazon.ca/Cook-A-Doodle-Doo-Janet-Stevens/dp/0152019243

Here is the recipe if you want to try it at home:

2 cups all purpose flour
2 tablespoons sugar
1 tablespoon baking powder
1/2 teaspoon salt
1/2 cup butter
1 egg, beaten
2/3 cup milk
3-4 cups fresh strawberries, washed and sliced
1 cup whipped cream

Preheat oven to 450 degrees fahrenheit. Sift together dry ingrediants. Cut in butter until mixture resembles coarse crumbs. Add egg and milk, stirring just enough to moisten. Spread dough into an 8"x 1 1/2" pan (I actually usually use a 9" cake pan), building up the edges, and allow to bake for 15 - 18 minutes. Allow to cool on a rack. The recipe suggests that you cut the cake in half and layer, but I usually just put the whipped cream and strawberries on top. If you have the appropriate pan (the 8" one) the layer option might work better, but I have always found that the cake is too crumbly to cut in half. Either way, it tastes great!